Table of Contents
Welcome to our guide to Cawpine Caverns Normal Crisis Dungeon. We will break down the enemies, items, trance abilities, and the optimal way to clear the dungeon with an S+ rank. Additionally, we'll provide party-building tips and suggest useful weapons and materia to bring along for the dungeon.
Enemy Info
Fire Rangda, Bomb, Bomb [Power: 44300] [Ice]
- Bomb, Fire Rangda, Fire Rangda [Power: 44300] [Ice]
- Fiery Condor, Fire Rangda, Fire Rangda [Power: 44300] [Ice, Wind] [▲✖]
- Motor Ball [Power: 44300] [Lightning] [▲✖◆]
- Red Dragon, Bomb, Bomb [Power: 44300] [Ice] [▲]
- Mole Crawler [Power: 44300] [Lightning, Earth]
| Name | Notes | Weakness | Resistance | Sigil | |
 | Fire Rangda | Immunities: Poison At the start of battle, uses the fire-element magic attack Flame Dance. Physical attacks are effective against this enemy. | Ice | Fire | |
 | Bomb | Immune to stun. Extremely vulnerable to ice-element attacks. When HP falls below a certain amount, uses the powerful multi-target fire-element attack Burst and reduces own HP to 0. | Ice | Fire | |
 | Fiery Condor | Immunities: MDEF Down Uses fire-element physical attacks. Grants self Fire Potency Up and Physical Resistance and inflicts Ice Resistance Down on self with Fiery Veil. Physical attacks are effective against this enemy. Magic attacks are effective for destroying sigils. | Ice, Wind | Fire, Earth | |
 | Red Dragon | Immunities: Darkness / Silence / Stun / Fog / DEF Down Uses many fire-element magic attacks including Red Dragon Screech. Inflicts fog with Fog Breath. | Ice | Fire | |
 | Motor Ball | Immunities: Poison / Darkness / Silence / Stun / Fatigue / Fog / ATK Down / DEF Down / MATK Down / MDEF Down Uses the powerful fire-element magic attack Rolling Fire. Becomes more aggressive the more time has passed during stream phase. | Lightning | Fire | |
 | Mole Crawler | Immunities: Poison / Darkness / Silence / Stun / Fatigue / Fog / PATK Down / PDEF Down / MATK Down / MDEF Down Inflicts MDEF Down with Tear Gas Bomb, and subsequently uses the fire-element magic attack Blazing Ray. Magic attacks are effective against this enemy. | Lightning, Earth | Wind |
Team Building Guide
Since most of the enemies are weak to ice and lightning, it's a good idea to bring Cloud equipped with Murasame and Sephiroth equipped with Edged Wings. Otherwise, just equip anyone with Thunder and Blizzard materia.
Make sure to bring some Ruin materia and sigils (![]() ,
,![]() ). Don't mind the
). Don't mind the ![]() sigils from the Motor Ball boss; it only has 4 stacks of them. For summons, bring Ramuh and Shiva. Equipping ice and lightning breach materia on your healer is also a good choice.
sigils from the Motor Ball boss; it only has 4 stacks of them. For summons, bring Ramuh and Shiva. Equipping ice and lightning breach materia on your healer is also a good choice.
For my team, I brought Cloud for lightning damage, Lucia for ice, and Aerith for healing and support. I equipped Aerith with the Guard Stick so she can buff magic defense, which is quite useful against the Mole Crawler, as it lowers magic defense and uses a magic nuke.
The dungeon isn't very difficult, and you can manage with just a level 50 party.
Permanent Items:
- 5,000 Gil
- 2x Draw Tickets
Notable Rewards:
Debrave Materia Reward (Rank A)
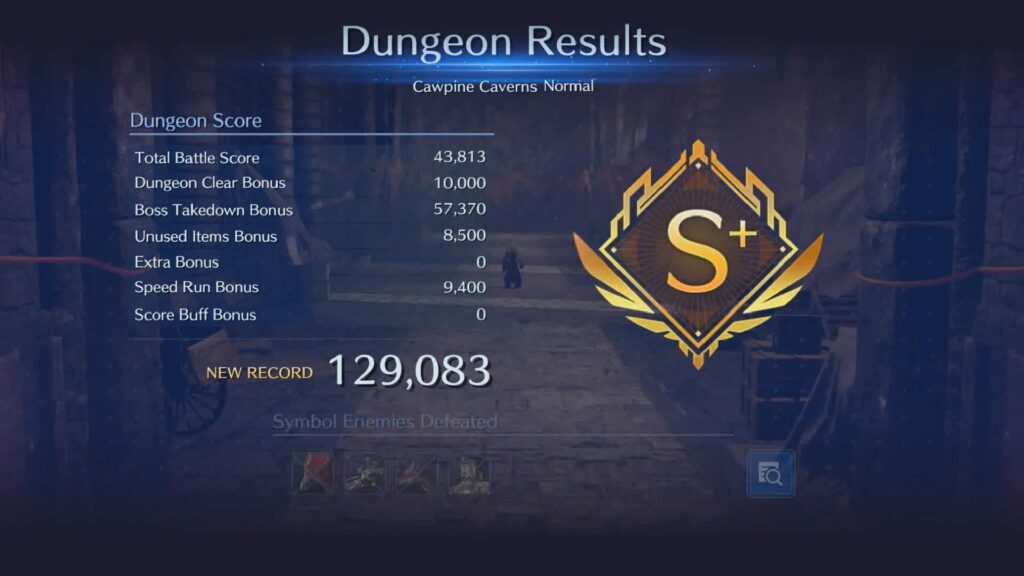
For those people who accidentally sold their Debrave materias, you can breathe a sigh of relief. You can obtain the recipe here and make your own. All you need to do is reach Rank A, which is easy to achieve.
Map

Walkthrough

In your first encounter, you'll face the Fiery Condor along with two Fire Rangdas. Quickly dispatch them using ice attacks.

After defeating them, it's time to choose your trance ability. If your party consists of physical damage dealers like mine, I recommend selecting 'Physical Attack +10%' to boost your offensive capabilities. If you're gearing up to face the final boss and want to be more defensively oriented, consider picking 'Fire Resist.' However, if you're feeling adventurous and are willing to trade some defense for increased damage, you can go for 'Lightning Potency +20%' and 'Fire Resist -30%.' The choice is yours, and it depends on your preferred playstyle and strategy.

Head upwards and then to the left, where you'll find a table with a shiny object. Approach it and pick up the Key that will unlock the gate.

Move to the left, and you'll come across a group of lesser enemies, including a Fire Rangda and two Fire Bombs. Begin by targeting the Fire Bombs with your ice attacks to eliminate them swiftly, and then focus your efforts on defeating the Fire Rangda.

To the left, there's a chest waiting for you. Open it to acquire 2x tents and 6x ethers. It's a good idea to refrain from using them unless you encounter a situation where they are absolutely necessary, as using items can impact your final score.

Return to the right and unlock the gate blocking the north side.

Proceed upward, and on the left side of the hallway, you'll come across a chest. Open it to reveal 6x potions and 3x summon charges.

Proceed to the right, and you'll face off against the Red Dragon accompanied by two fire bombs. Start by defeating the fire bombs before focusing on the Red Dragon. Use ice attacks to deal with the fire bombs efficiently, and make sure to summon Shiva when the Red Dragon is interrupted. Keep a close eye on its 'On the Hunt' attack and be prepared to cancel it by breaking the ![]() sigils.
sigils.

After defeating the dragon, it's time to select your trance ability. I recommend going for 'Mag. Attack A +10%' if you have a magic damage dealer in your party. Alternatively, if you want to bolster your defenses, consider 'Fire Resist +15%.' However, it's advisable not to choose 'Ice Potency +20%,' as there are no more bosses weak to ice in the upcoming battles. So, opt for 'Mag Attack' if you have a magic user, or 'Fire Resist' for added protection against foes like Motor Ball and Mole Crawler.

After defeating the Red Dragon, you'll obtain a key, and there's another key to be found by picking up the shiny object in front of you. Head northeast, and you'll come across a chest that holds 5,000 gil.

Return the way you came and unlock the gate across from your current location.
Move to the right, where you'll discover two chests. One of these chests holds a cottage, while the other contains 2x draw tickets.

Be prepared to face a group of lesser enemies, including 2 Fire Rangdas and a Fire Bomb. Focus your attacks on the Fire Bomb first, and then take on the Rangdas.

Retrace your steps back to where you came from and head southeast. Unlock the gate and proceed inside, where you'll face the Motor Ball.

Use lightning attacks on the Motor Ball, but be wary of its 'Gear Boost' ability. When it activates, make sure to target and destroy the sigils, and consider summoning Ramuh during the interrupt phase.

After defeating the Motor Ball, you'll have the opportunity to select a trance ability. I recommend opting for 'Lightning Potency +10%' as it's the most useful choice, given that the other two options aren't as beneficial.

Return to the hallway and proceed north, where you'll face the Mole Crawler. Before engaging in the battle, ensure that everyone's HP is fully restored by utilizing the cottage you acquired from the chest earlier.

We're all set to take on the Mole Crawler. Begin by hitting it with lightning attacks. Be cautious as it employs area-of-effect physical attacks, so have Aerith on healing duty.

When the Mole Crawler goes on cooldown, it reduces its own magic defense, making it vulnerable to lightning magic. If you lack lightning magic users like I did, consider summoning Ramuh as an alternative.

Keep an eye out for its 'Blazing Ray' targeting one of your units, and buff the targeted unit with Manaward to enhance their survivability. Keep dealing damage, and you'll soon emerge victorious.

If you did everything efficiently, you will receive an S+ ranking, which is more than enough to obtain the Debrave materia recipe. Congratulations on conquering the Cawpine Caverns in the normal version!
